Where to Place Stop Loss and Take Profit: A Beginner's Guide
Learn to set Stop Loss and Take Profit from price structure, not from the amount you want to lose. Includes a Lot calculation example and the effect of Slippage during big news.
This article was compiled automatically from the sources listed below
Many beginner traders know they need to set a Stop Loss (SL) and a Take Profit (TP), but aren't sure where to place them. Some pick numbers by feel. Others set them based on an amount of money they can "just about afford to lose," and then wonder why they get stopped out so often.
This article explains how to place SL and TP step by step. The content is general knowledge for educational purposes only and is not advice to buy or sell any asset.
What Are Stop Loss and Take Profit?
- Stop Loss (SL) is the price at which you tell the system to close your order automatically when the market moves against you, to limit the damage.
- Take Profit (TP) is the price at which you tell the system to close your order automatically when the market reaches your profit target.
These two levels let you know in advance "how much I lose if I'm wrong, and how much I gain if I'm right" before you open the order.
Why Set Them on Every Order
- The market can move faster than you can react. Price may run against you while you are asleep or away from the screen.
- They protect you from emotions. When an order is in the red, most people want to wait a little longer, which often lets losses grow. An SL set beforehand removes decision-making under stress.
- They make risk calculable. Without an SL, you don't know how much you are risking per order, so you can't control your position size.
- TP gives you an exit plan, not just an entry plan. It reduces emotional closing when profits start to rise or fall.
Set It From Price Structure, Not From the Amount You Want to Lose
A common beginner approach is to think "I can afford to lose $10," and then place the SL at a distance from the entry that loses exactly $10. The problem is that the market doesn't know how much you are willing to lose. An SL placed this way may sit in the middle of normal price fluctuations and get hit easily, even when your view of the market isn't wrong.
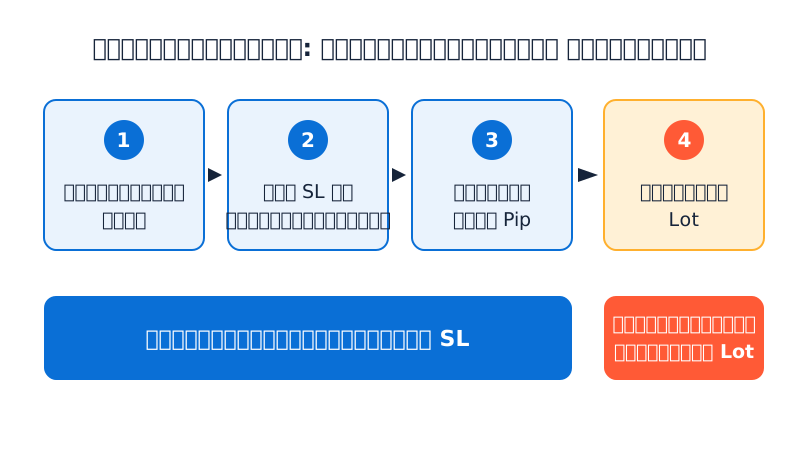
A better order of steps is:
- Look at price structure first, such as the latest low or high (Swing Low / Swing High), support and resistance.
- Place the SL at a point where, if price reaches it, your idea is probably wrong. For example, below support for a Buy order or above resistance for a Sell order, with a little extra room so you aren't caught by short-term swings.
- Measure the distance from your entry to the SL in Pips.
- Then adjust your Lot size so that your total risk doesn't exceed the limit you set.
In other words, let price structure decide the SL distance, and let the money amount decide the Lot size, not the other way around.
For TP, look for areas where price is likely to slow down or reverse, such as the next resistance for a Buy order, and compare the distance with your SL using the Risk Reward ratio.
Calculation Example (Hypothetical, for Learning)
Suppose your account has $1,000 and you decide to risk no more than 1% per order, or $10.
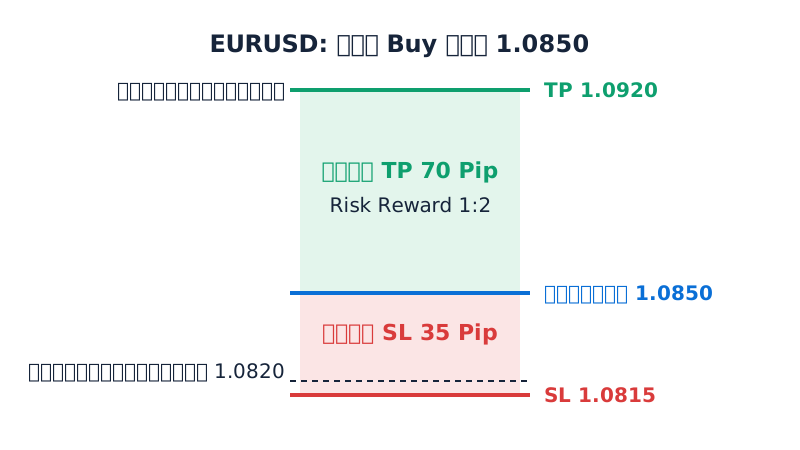
Suppose you analyze EURUSD and plan to Buy at 1.0850, with the following structure:
- The latest low is at 1.0820
- The nearest resistance is at 1.0920
Step 1: Place the SL. Set it 5 Pips below the low, at 1.0815. SL distance = 1.0850 − 1.0815 = 0.0035, or 35 Pips
Step 2: Place the TP. Set it at the resistance, 1.0920. TP distance = 1.0920 − 1.0850 = 0.0070, or 70 Pips
Step 3: Risk Reward = 70 ÷ 35 = 1:2 (risk 1 part to aim for 2 parts)
Step 4: Calculate the Lot size. For EURUSD, 1 standard Lot has a Pip value of about $10 (the actual value may differ slightly by account).
- Risk of $10 ÷ 35 Pips = about $0.286 per Pip
- 0.286 ÷ 10 = about 0.0286 Lot
- Round down to 0.02 Lot (which is worth $0.20 per Pip)
Result:
- If the SL is hit: 35 × 0.20 = $7 (below the $10 ceiling)
- If the TP is hit: 70 × 0.20 = $14
Notice that we didn't squeeze the SL tighter to lose less. We reduced the Lot size instead, so the SL stays at a point that makes sense structurally.
Note: A Risk Reward of 1:2 means that, ignoring fees and Spread, you would need to win more than about 33% (1 ÷ 3) of your orders to start breaking even. But no one can guarantee the actual win rate of any plan, so you need to test it with your own data.
Slippage During Big News: An SL Is Not a Price Guarantee
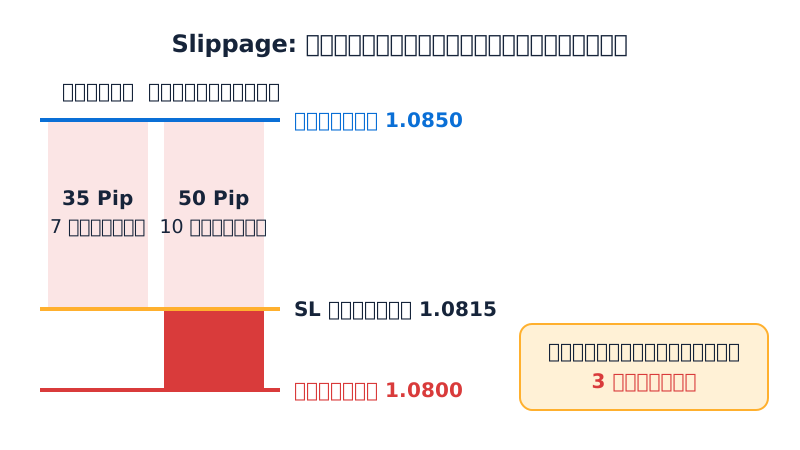
An SL is an instruction to close your order when price touches the level you set, but it doesn't guarantee the order will close at exactly that price. During big news, liquidity gets thinner and price may jump past your level, so the system closes at the next available price. This difference is called Slippage. Spread also tends to widen during these times.
Using the same example, suppose price jumps past 1.0815 and closes at 1.0800.
- Actual loss distance = 1.0850 − 1.0800 = 0.0050, or 50 Pips
- Actual loss = 50 × 0.20 = $10 instead of $7
That is $3 more than planned. With a larger Lot, the difference would be even bigger. Basic ways to handle this:
- Check the economic news calendar before opening an order, and decide whether to hold through the news.
- Reduce your Lot size around major news.
- Allow in your plan for the actual loss to be larger than calculated.
- Don't risk so much per order that your account couldn't handle it if Slippage happens.
Common Mistakes
- Not setting an SL at all and "waiting for price to come back," which it may never do.
- Setting the SL too tight, so normal fluctuations stop you out. Check recent price swings, for example by using an indicator like ATR as a reference.
- Moving the SL further away when price gets close to it, because you don't want to admit you're wrong. Only move it to reduce risk.
- Setting an unrealistically distant TP just to make the Risk Reward look good, even though resistance sits in the way.
- Using the same Lot on every order regardless of SL distance, which makes the real risk per order uneven.
- Ignoring costs such as Spread and fees, which eat into the distance of both the SL and the TP.
Summary
- Set an SL and TP on every order so you know your risk in advance.
- Let price structure decide the SL position, then use Lot size to control the amount you risk.
- Compare the TP distance with the SL to see the Risk Reward, and check that the target isn't unrealistically far.
- Remember that Slippage during big news can make the actual loss larger than calculated.
Practice these steps on a demo account first, and remember that trading always carries the risk of loss. No method of setting SL or TP can guarantee results.
Lesson quiz
Score at least 80% to pass this lesson.
According to the article, what is the better way to decide where to place a Stop Loss?
Why does the article say having a Stop Loss makes risk 'calculable'?
A trader buys EURUSD at 1.0850 and places the SL at 1.0815 and the TP at 1.0920. What are the SL distance, the TP distance and the Risk Reward?
In the article's example, 0.02 Lot is worth $0.20 per Pip. If price jumps past the SL because of big news and the order closes 50 Pips from entry, what is the actual loss?
A trader's SL keeps getting hit by normal price swings, and they worry about risking too much. What approach does the article recommend?
Ask the AI tutor about this lesson
Stuck on something? Ask and get a simple answer with examples.